The iPhone’s built-in Voice Memos app lets you record audio snippets and play them back later. Here’s how to transfer a voice recording to your computer or send via email.
The iPhone’s built-in Voice Memos app has been a useful addition ever since it was bundled with iPhone OS 3.0. It lets you record audio snippets and play them back later, and you can send them to yourself or others using the built-in email sharing feature.
It’s not entirely clear how to use the Voice Memos app though, or how to send a voice recording to someone via email – let alone figure out how to transfer a voice recording to your computer.
Here are the steps for 1) recording audio with the Voice Memos app on your iPhone, 2) sharing those audio snippets using email, and 3) transferring those audio files to your computer:
1. Record audio with the Voice Memos iPhone app:
Open the Voice Memos app on your iPhone and tap the button on the left to start recording. You can talk into the microphone or place it near what you’re trying to record.
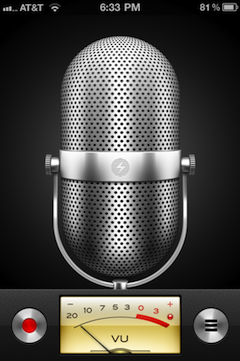
Tap the button on the bottom right to stop recording, and tap it again to see a list of voice memos that you’ve recorded.
2. Share recorded audio clips using email:
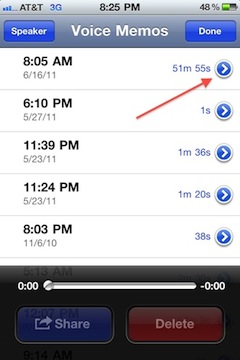
Tap the arrow next to each audio clip to view options for sharing that clip.
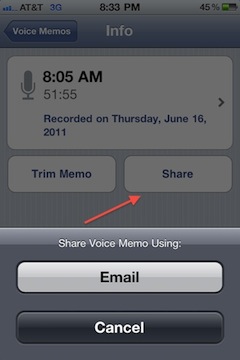
Tap the “Share” button and select “Email” to send the audio clip as an email to yourself or someone else.
3. Transfer recorded audio clips to your computer:
If you have a large audio recording, you won’t be able to share it using email. For example, the audio clip I recorded above was for over 50 minutes and was about 24 MB in size – far too large for email, and my iPhone wouldn’t let me send it.
In this case, when the audio file is too large to share using email, then you’ll need to transfer the audio file to your computer using iTunes.
Connect your iPhone to your computer using the USB cable, and wait for iTunes to start (or run iTunes directly if it doesn’t start).
Select your iPhone in the left sidebar of iTunes, and then click the “Music” tab.
Check the option in the Sync settings to “Include voice memos”, and then click the “Sync” button to transfer over your voice memos.
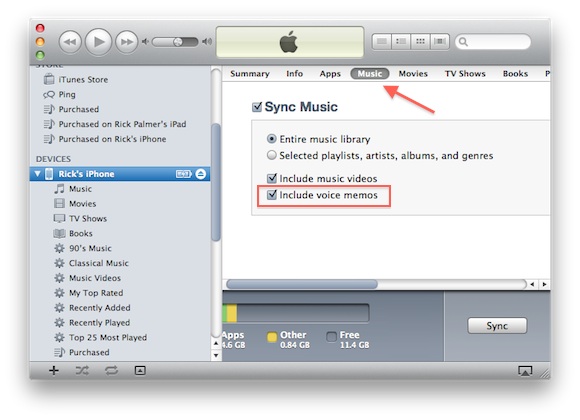
After the sync has completed, you’ll see a new “Voice Memos” playlist in iTunes that contains the recorded audio clips.
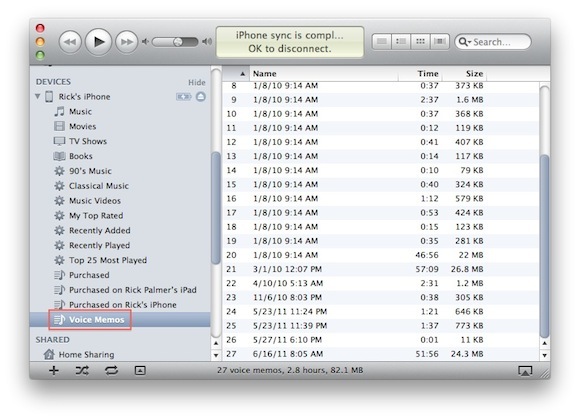
To access the actual voice memo files, look in your Music folder under iTunes/iTunes Media. Here’s the path on my system (Macbook):
/Users/rick.palmer/Music/iTunes/iTunes Media
The audio files are stored as .m4a music files, that can be opened in Quicktime or converted to .mp3 using a music convertor program.
Darn Apple. This works only
Darn Apple. This works only if the PC you are connecting to is being synched with all your music.
You can not synch your voice memos with just any computer as it will force you to remove existing music, movies, TV shows, books and ringer tones from the phone to use this approach. It’s an insanely bad user experience when you are sitting there with your voice memo and the computer you want to load it into is too large for an e-mail and you end up having to delete all your media content just to get one file transferred.
Apple fail miserably in user friendliness on certain use cases of doing file transfers of none DRM critical content. Crap.
I 100% agree to the comment
I 100% agree to the comment above! F…g Apple is annoying!
Here is what I have found, if
Here is what I have found, if you iMessage the file to yourself and then hit the side arrow next to the file in iMessage it will open the file. Hit the share button and then email. It worked for me with an hour and a half long file just fine. I wish Apple wouldn’t make this so difficult.