With the iPhone’s built-in iPod music player, you’d think it would be easy to select a music file and set it as your default ringtone, or as a custom ringtone for one of your contacts. But as you’ve probably already discovered, it doesn’t work that way.
With the iPhone’s built-in iPod music player, you’d think it would be easy to select a music file and set it as your default ringtone, or as a custom ringtone for one of your contacts. But as you’ve probably already discovered, it doesn’t work that way.
Sure, you can right-click on a music file that you’ve purchased from iTunes and select “Create Ringtone”, but you’ll be charged another 99 cents for the conversion. Not cool, imho.
Fortunately, iTunes has everything you need to create your own custom ringtones from music you already own, and without paying any money. Here’s how to do it using iTunes 8.0.2 (will also work with earlier versions, but the screens and menu names might be slightly different):
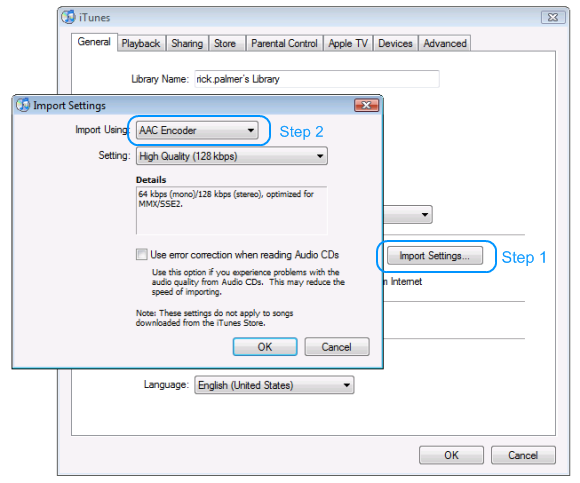
1. Configure iTunes to convert music to AAC format
AAC is the standard ringtone music file format, and you tell iTunes to use this format by configuring it’s Import Settings (the same settings you use when importing music from a CD).
Open iTunes and select the “Edit” >> “Preferences” menu.
Click the “Import Settings” button and choose “AAC Format“.
2. Trim the song length
Music files that are converted to ringtone format will not be recognized by your iPhone if they’re longer than 35 seconds.
Select the song in iTunes that you want to convert to a ringtone, and select “Get Info” from the pop-up menu. Select the “Options” tab and change the Stop Time to 0:35.
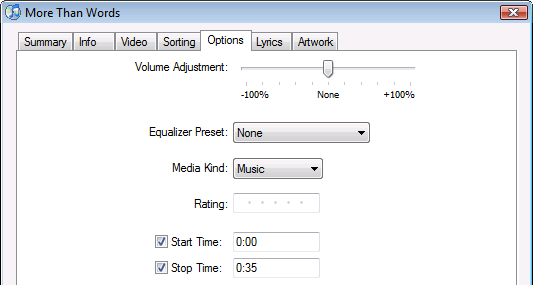
This step must be completed before attempting the next step, or the file length will be too long.
3. Convert the song to AAC format
Right-click on the song in iTunes, and select “Create AAC Version“.
iTunes will create a copy of this song in AAC format, but it will be trimmed to 35 seconds.
4. Rename the AAC music file with a .m4r file extension
The converted music file from the previous step will have a .m4a file extension, which needs to be changed to .m4r in order for iTunes and your iPhone to recognize it as a ringtone.
You can change the file extension right from Windows Explorer (or using the Finder on a Mac).
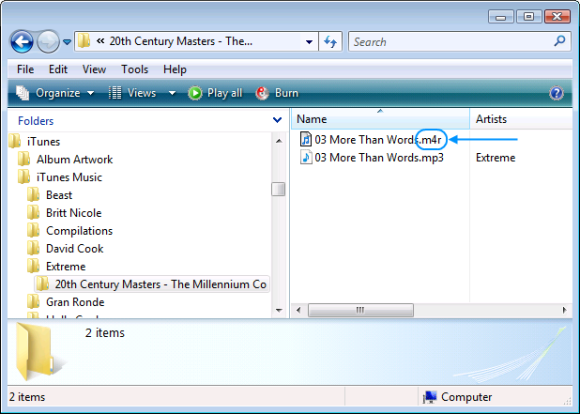
Find the place where iTunes created the new file by right-clicking the song again in iTunes and selecting “Get Info“. The file location will be at the bottom of the Get Info screen, under “Where“.
5. Open the ringtone with iTunes
Now that you’ve converted your song to AAC format and renamed it with a .m4r file extension, it’s ready to load into iTunes where it can be s.
You can double-click the .m4r file from Windows Explorer, or drag and drop it onto your iTunes music library. iTunes will automatically place the song in your “Ringtones” folder.
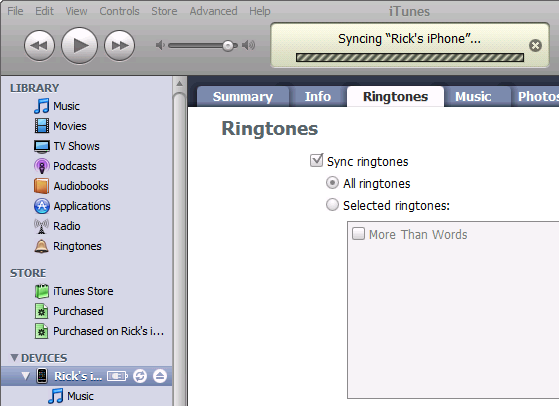
6. Sync your iPhone with iTunes
When you sync your iphone with itunes, your new ringtone will be copied to the ringtone folder on your iphone and can then be assigned as your default ringtone, or as a ringtone for a particular contact.
Select your iPhone from iTunes and click the “Sync” button.
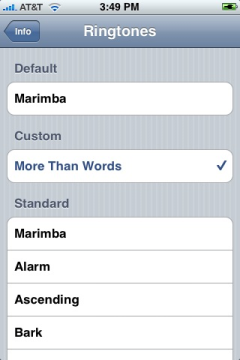
7. Set the default ringtone on your iPhone
Back on your iPhone, you can set the new ringtone as your default ringtone by tapping “Settings” >> “Sounds” >> “Ringtone“. Your custom ringtone will be listed at the top of the screen in a section titled “Custom“.
You can also assign the ringtone to an individual contact(s). Just go to your “Contacts“, tap on the desired contact, and tap “ringtone to assign the song as that contact’s ringtone.
That’s all it takes to create a free ringtone for your iphone using itunes, and without having to pay a cent.
Extra: Making ringtones from DRM-protected iTunes songs
If you’ve purchased a song from iTunes, then they’re locked from being copied or converted to other formats from within iTunes (grr… thanks a LOT Apple – do you know how many people hate you for doing this??)
You’ll first need to use a program like Aimersoft’s MP4 Converter to remove the DRM protection, allowing the song to be converted to rintone format using the instructions above.
I discussed this approach in another article titled How to legally remove DRM protection from iTunes songs, but here’s a quick summary:
You’ll first need to find the location of the iTunes song, which you can do by right-clicking on the song in iTunes and selecting “Get Info” from the popup menu. The location of the song will be near the bottom of the info screen:
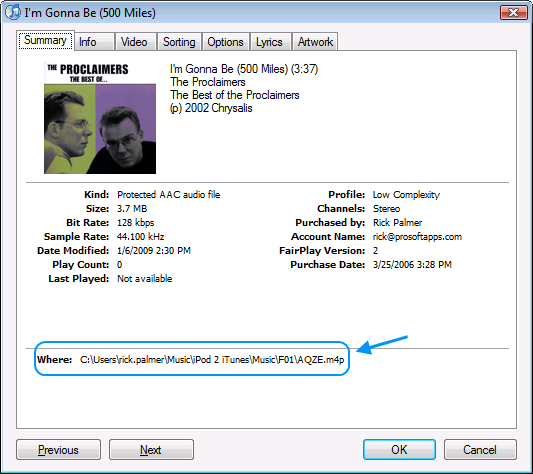
Open this folder in Windows Explorer, and copy the file to another location on your hard drive.
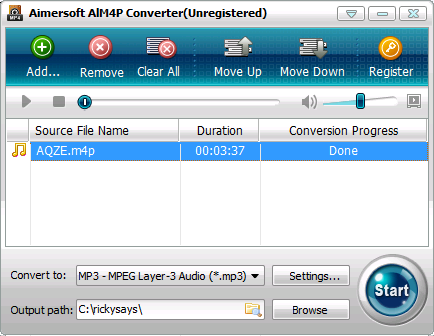
Load the file in Aimersoft’s MP4 converter and convert it to regular MP3 format. This program plays the file and records the sound to a digital format, so on cracking of DRM protection is used (which keeps it legal).
Drag the MP3 file back into iTunes and follow the instructions above for converting it to AAC ringtone format, syncing it to your iPhone and setting it as the ringtone for one or all of your contacts.
Ringtone trouble
Hey man, great description, but there’s one problem…
Before I DL’d Itunes 8.0.2, I think I was using an earlier version, and I created a lot of ringtones using this method, and it all worked fine. Then my laptop crashed, I had to reformat it and downloaded the newest Itunes 8.0.2…now using the same method, it doesn’t seem to work anymore. Before, when you created an AAC version and sent it to your desktop, it would actually have the extension .m4a, and now it doesn’t. It’ just has the song name and the icon says MPEG4. If I change it .m4r, it doesn’t do anything and won’t play in the ringtones section in Itunes, it’ll only play in the library…any suggestions to what I can do about that? I would really appreciate it, cause its reallllly frustrating. Thanks
I followed your instructions
I followed your instructions on How to create a ringtone for free on
Itunes. Is it necessary to buy a program to download to my iphone from my mac?
converting song to ringtone for iphone
Hi,
I followed your instructions, but, although I changed the name of the song to song.m4r, it still had a .m4a extention. It was song.m4r.m4a when I looked at properties/details. Moreover, after I close the file and open it again, it reverts back to plain song.m4a. Do you know what I’m doing wrong? If so, would you please help me to do it correctly? iTunes is not recognizing it as a ringtone.
Thanks,
Nora
You’re not changing the name
You’re not changing the name to .m4r you’re chaning the file extension. So if the song’s name appears as “Allstar.m4a” you’re going to change it it to “Allstar.m4r” if you have a Mac its easier to do because it always shows the file extension with the name, if you have a PC then you might need to figure out how to change the file extension.
Hi Ricky,
I too can’t get
Hi Ricky,
I too can’t get the ringtone to work. Do you think it has to do with the latest iTune update? If so have you heard of any work arounds?
All the best,
Tim
Same problem as others
Same problem as others before. I create the m4r version, it is shown in the Library as a Ringtone kind file but can’t get it into the Ringtones. What am I missing? Thanks!
to Alain..
delete the newly
to Alain..
delete the newly created .m4r file from your itunes, not necessarily from your computer, and drag the file into your itunes library again. it should work.
There are many easier ways,
There are many easier ways, i.e. go to http://www.mobilespin.net and use their free ringtone tool.
pics to iphone
hi all , thanks for the heads up on making ringtones but i want to also know how can i get pics and videos from my micro sd card from my old phone to my new iphone , any help would be muchly appreciated .
Easier way with very few steps
There is an easier way to do this. Go to mobilespin and use their? free online ringtone tool. After you create your ringtone, you get a .m4r file which you put in iTunes and sync, that’s it. Note that if you have iTune songs in M4P format, convert them to MP3 first – there are many free online tools to do this